Copyright © June Cleaver in yoga pants
Design by Dzignine
Wednesday, October 31, 2012

on becoming farmers and learning to be at home

Farmers? Homesteaders? I prefer the latter I suppose (though I don't own overalls or muck boots, although I do have a pair of rainboots that I use for that purpose, although they are polka dotted and from Target, ha!)

And so we dive head in, creating in one month a hen house (awaiting our new friends, to be picked up soon), a garden box, (covered with plastic sheeting, where we plant spinach, radishes, swiss chard, and lettuce) and a compost pile (which at this point is a pile of scraps covered in dirt and leaves in the field.)

And so. We are doing it. The country life. The homesteading life, which to me is a life lived purposefully towards a self sustaining existence.

Why?

Because it feels right.

We scour our woods for pinecones and plants and fallen trees to cut up. (Next up. A wood stove.)

We spend our weekends outside on projects.

We shop less, and havent eaten out in weeks.

I tell the kids, can you climb that tree? And they do. And I say, hey, it's like your own jungle gym! Who needs a park! And their eyes light up. Oooooh.

And the blue jay outside our kitchen window visits from time to time, and the wind in the pines sings in the evening light, and we are home, blissfully so.


“...And we pray, not for new
earth or heaven, but to be quiet
in heart, and in eye clear.
What we need is here.”
―    Wendell Berry


our winter garden, planted. its 75/80 degrees inside on a sunny day, easy. so crazy cool!
 
 
“One of the most important resources that a garden makes available for use, is the gardener's own body. A garden gives the body the dignity of working in its own support.
It is a way of rejoining the human race.”
―    Wendell Berry
 
the outside of our winter garden box
 
“And the world cannot be discovered by a journey of miles, no matter how long, but only by a spiritual journey, a journey of one inch, very arduous and humbling and joyful, by which we arrive at the ground at our own feet, and learn to be at home.”
―    Wendell Berry
 
the completed hen house, waiting for our new residents :)
 
Tuesday, October 30, 2012

anti-recipe #55 gluten free chicken dumplings

So. Sickness. Sickness has claimed this house. I am fighting back. Re-inspired by Weston Price eating and my latest gluten free endeavors. WE SHALL NOT BE THIS SICK EVER AGAIN. Ha.

So. I am back to the gluten free thing. With my gut (Crohn's disease and IBS etc) gluten free is just better, easier. I can (and usually have to) go back to gluten while pregnant but somewhere around a year after baby is born my body goes, oh, just kidding, we dont like gluten. Which is where I am now.

But a more relaxed place with it. Lets face it fresh baked homemade bread is just plain good. Also, pizza. There is no reason to eat gluten free pizza. Its terrible. So, every now and then I will have a slice of bread or pizza. I am fine with this. But mostly my days are gluten free.

Leading to this meal.

We roasted a chicken last week. (See a previous anti-recipe on how I do this) And we always boil the chicken carcass after, to make a stock. I did this, picking off the meat (and putting excess into ziplock bags and throwing it in the freezer...I use this meat for casserole or fajitas, anything really. I never buy just plain chicken breasts. I went to buy some the other day, in an attempt to cook a meal for my sisters family, and was HORRIFIED at how much chicken breasts cost. We buy two whole chickens for that price at Costco! Ok. End rant.) and then, after straining the broth, made a little chicken soup the next day (just throwing in a carrot or two, some of the meat, some dried onion, dried parsley, and some celery). We never ate it. So two days later I put it in the freezer. I love freezing homemade soup. Such a nice thing to pull it out, defrost, and have for a quick meal. I sound like a total snob but I cant stand canned soup after realizing how easy it is to do this. Homemade soup is just better.

In any case.

So not having any gluten free noodles, I thought, ah, dumplings!

I took one cup of Pamela's pancake and baking mix (which has baking powder and a great combo of GF flours including almond flour) added homemade plain kefir, maybe half a cup. I would've added an egg but we are out (not for long though, he he). Also a splash of milk. Then maybe 1/3 cup of my GF flour blend (by Namaste flours) to get the right consistency and finally a handful of shredded cheddar and some garlic salt.

So to cook them properly, do this, get your soup to a soft boil (is that the right term?) drop in large biscuit size spoonfuls, then cover and let them cook for a good 5 or more minutes. Maybe more like 10. Just peek inside with a fork to make sure it's cooked. Then let it cool a bit and serve. Really so good!


Friday, October 26, 2012

gnome crafty post

So. Because I no longer go on play dates (we know no one up here!) and the kids have been sick on and off for so many weeks (no real exploring of our new town) I have been getting a lot of crafty action. This is my day today. Tom and Jerry. Crafting. Tom and Jerry. Crafting. It works, you know?

(I dont even want to talk about how little man has the apparently new to us bug introduced via little miss last weekend and has been throwing up all day. Dont want to talk about it. At. All.)

So. Crafting.

Gnomes. Gnomes are the perfect fall fanciful craft. I am toying with the idea of making baby dear be a gnome for Halloween. With a little pointed red hat and a fake beard attached to it. Right?

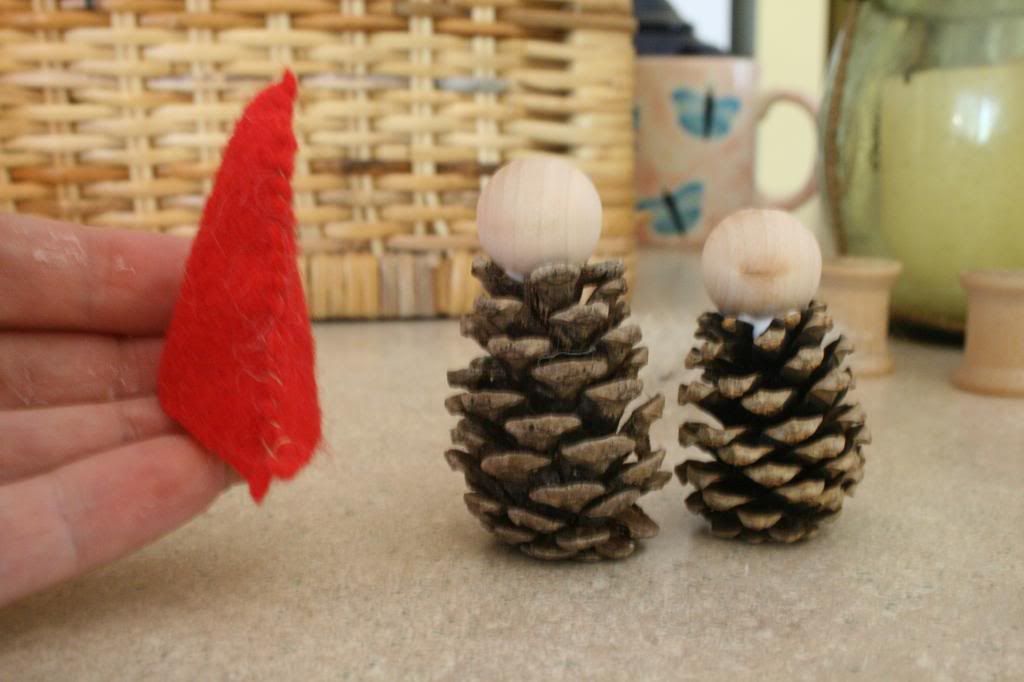
So. I saw this little craft for turning pinecones into little gnome men with wooden beads, red felt, and a bit of wool. And it was so stinking easy. And SO DAMN CUTE.

Here are the pictures.

choose two pinecones that can stand up on their own, and that have a pointy
end at the top to put the wooden bead head on
 
 
add wooden beads for the head, gluing in place. stitch up a simple red hat,
out of felt


add tufts of wool for a beard.
 
voila, gnomes. here they are enjoying their fire on our nature shelf
 

Then I saw this pinterest post of a little gnome family. HAVE TO MAKE THOSE. So I did, using felt (regular felt from the fabric store, nothing fancing) and hand stiching them.


the basic shape was important to get down. i trimmed as i sewed it together


first i sewed up the body, then the cap

 
the little face piece is inserted in the hole, and then stuffed with
wool from the underside. i then stiched a running stitch around the
neck to gather it tight
 
 
then i sewed on the bottom, leaving a flap to stuff.
 
 
first i stuffed it with wool, then rice on the bottom to make them
stand up better. little miss liked this part.
 
our finished brother gnome


So this post took me all day to write and my kids are watching family movie without me. BAD MOMMY. Dude, I am so beat. I hope this weekend is good and refreshing (or at least I get in a nap)
 
 
Happy gnome crafting!
Wednesday, October 24, 2012

my day

Apparently this is how I am spending my day. Sad face. After two weeks of sickness for little man, a weekend for dada, and this weekend for little miss it is now baby's turn. It is so sad how confused babies are when they throw up. Why is all that nice milk coming back out?? What is happening mama?? So sad. She keeps reaching for her little pumpkin doll we made, who she calls "doll doll" and laying her head down on my chest with a sigh, then trying to get up and play again,then rushing back to me to puke into the towel across my chest again. Does anyone else do baby puke this way? Much easier than trying to shove their little heads over a bowl all day. So sad.

Also.

I better not get this thing. Little man said this morning "next it's your turn!" umm, no I say, mama's aren't allowed to get sick. "oh" he says. "that's good"

Dosing up on vitamin c and d now.

Monday, October 22, 2012

look what I am doing...

Ha! Did you know you could cook pumpkins like this?? I had no idea. My sister said she saw this on pinterest and I thought, why the heck not!? So, without even bothering to look it up ( maybe I should've? ) I threw it in the oven at 300 and.... We shall see what happens! Supposedly you just open it scoop out seeds and then scoop out nicely cooked pumpkin flesh. Cool right? Have you ever tried chopping and peeling a pumpkin? It sucks, so, this is worth a shot I figure. If it works I will let you know...


So, it totally worked! And don't just scoop out the insides, just cut off chunks and peel off the skin! So easy! I am freezing it in ziplock bags to use for pies later. Yay! Lazy!

Sunday, October 21, 2012

anti-recipe #54 the best easiest dessert ever. no seriously

No, seriously it is. I am sitting with a glass of wine and an entire pan of these babies. I am supposed to be working on homeschool plans for the week while dada wrestles two wide awake baby girls downstairs ... But I have to share this moment and recipe.

Butterscotch brownies ... Blondies, whatever you choose to call them they are So Damn Good.

Melt one (yes one ENTIRE) stick of butter in the micro. Stir in one cup of brown sugar, don't substitute, it won't be the same. Seriously some things are worth making healthy, but some just arent (pizza is in this category for me too). JUST EAT THE BUTTER AND SUGAR! Okay, I'm done. Add one egg and one tsp vanilla and one tsp salt. Stir in one cup flour. Pour into greased 8x8 pan. Now, here is my antirecipe bit, press a handful of butterscotch chips into the batter and a good sprinkling of nuts - walnuts and pecans are perfect or, oooh, macadamia nuts would be amazing! I have to say i am not huge on nuts in things (banana bread, etc) but it really is essential in this dessert, and by putting them on the top of the batter rather than IN the batter they get all roasty and toasty and delicious. Yummmm. And if you are the type that must add chocolate in every dessert, add some chocolate chips too. Bake at 350 for about 25 min. Don't overtake though!

Now let cool, then, I dare you not to eat the whole pan. Ready, go! You are welcome ( or my apologies rather, ha!)


Saturday, October 20, 2012

fall fairies craft and story

So we were sitting in our cozy chair the other day, me and my girl, looking outside at the sunshine and the fall colors, and somehow she brought up the leaves and the colors and I found myself telling this story.

Every year at fall the Sun King packs his things up in his flaming chariot and he and fiery horses leave the sky above us to make way for King Winter.

And then King Winter rules the sky. He brings with him Jack Frost and the fall fairies. Jack Frost is in charge of creating beautiful crystals all over the grass and trees and everything around us. The fall fairies are Red Fairy and Yellow Fairy and Orange Fairy. They paint all of the leaves beautiful colors and then one by one the leaves fall and then the fall fairies work hard to put all the seed babies to sleep deep in the ground so they are warm and cozy all winter.

Then King Winter says "Now, for a blanket!" And he gently lays down a snow blanket to cover up the leaves and seed babies. And the fairies tuck in the seed babies under the white blanket. And Jack Frost hangs icicles on all the trees and houses. And then the whole world sleeps.

"And then what Mom?"

And then in the spring the Sun King comes back. And King Winter packs his sled pulled by polar bears and they go back to his frosty castle in the sky. And the Sun King makes the snow melt and the flower fairies help him to wake up all the seed babies and they stretch out to say thank you to the Sun King and bloom beautiful flowers.

And then, a smile. And then, "Tell it again Mom!"

Much better than the explanation we gave little man at this age "You see, the earth is tilted on its axis and when it goes around the sun...etc. etc. etc."

So, fall fairies have officially entered our little corner of the world, and it makes us happy. So here is how we made some fall fairy dolls. You can too, if you want.

Take some dyed rovings, red, yellow and orange. Twist and pull into the shape of a fairy with wings. Its not hard, really. Loop some around the body in an X shape to secure the fairy in place. Then hang with a bit of thread. I found some dead vines clearing out brush and twisted it into the shape of a wreath, which was the perfect place to hang our fairies, right over our pinecone gnomes sitting in front of their fire. (Next post. Ha. And yes, I am going a little nuts with the fall crafts. I know. I cant help it. I loved this stuff as a kid and having kids is an excuse to relive it again. In any case I figure if I loved this stuff as a kid my kids probably appreciate it too...maybe...HA.)

And a few days later she smiles and points to a bright orange tree and declares that the fairies must've worked extra hard on that one. And I smile back. That's my girl.

 
Wednesday, October 17, 2012

playsilks for baby

So. In keeping with the "I AM going to make a cake for this baby" theme, I also was determined that I would dye her her very own set of playsilks. Move or no move. And yes, we were in the middle of moving.

I ordered the silks from this company, I got the hand bound ones, 30 x 30 8mm size. Perfect size and texture for all kinds of play. And they are like $4. I got three. (As well as big ones for the kids to use for a play stand, which we still have not yet dyed...)

I have to say. I freaked myself out about it a little too much because they were super duper easy to dye. The kids and I did it one night after she was in bed, in about 15 minutes. Why did I pay $15 a piece for these for the other kids??

So. Here is what I did. (oops. No pictures of the dyeing process...it was late...I was tired...children were involved...and hot vinegar...etc etc etc)

First of all, I totally just used regular old food dye. I followed the color drop recommendations on the packaging for a soft blue, soft green, and pink.

Put necessary drops in the hot water. Add a glug of vinegar. Stir. Place a silk in the pot. Stir. Let it bubble for a good 15 minutes. You can tell when the color has absorbed when the water is clear and the silk is dyed. (How is that for logic, ha!) Obviously, if you want it lighter pull it out earlier. I then carried the hot silks down to the washer, threw them in with no soap just a tad of vinegar and set it on handwash cyle. Then I let them drip dry over night. So easy!

Then I thought. Huh. That was easy enough. Her birthday is still a day away. And I am tired of unpacking boxes. LETS CRAFT SOME MORE. I had seen these nifty little felted wool balls that were hollow with a small slit where you can stuff in a silk. I thought. Yes. Baby likes balls. And she likes putting things in and out of other things. I can do this.

So I took a few crumpled tinfoil balls, felted some wool around them (I happened to have pre-dyed wool rovings lying around that more or less matched the silks we had just dyed). FOr some reason the washing machine trick to make wool balls wasnt working so I poured warm water on them and used soap and just hand felted them. It worked perfectly and was a great thing to be able to do outside while the kids played (I am always searching for things to keep my hands busy while monitoring baby outside time...I hate sitting there thinking about all the work that awaits inside, you know?)

They turned out...okay. The silks didnt entirely stuff in but they make these great toss balls, shooting stars, whatever, that the big kids love to play with (and throw at each other). If you are going to try this make your tinfoil balls bigger than mine (the size of a golf ball would be good, then wrap your wool around that).

Sunday, October 14, 2012

D is for dragon

So school was better this past week, you will be relieved to know, we all survived. PHEW, arent you glad? And while little man perplexingly had hives all week, he felt much better, so. That is good.

I however...

Background:

So we celebrated Michaelmas a few weeks ago, on Monday. It traditionally is held at the end of September and I have to say I love the meaning of it. The idea is to celebrate the harvest but also to sort of prepare oneself for the coming of winter. As St. Michael banished the dragon from the earth, in the story below, we too are to recognize the end of green and growing and outwardness of summer and to move to a more internal focus, banishing the dragons in our lives, focusing more on inward growth and steadfastness. Students, in Waldorf schools, reflect on being disciplined and studious. The summer of endless sunny days are over. Now is the time for practicing letters and numbers and settling in for the work of the school year ahead.

And as mothers, well, this hits home for me. Winter is hard - HARD - as a stay at home mom with young kids, especially up in the frozen tundra where we live. And yes, the kiddies go outside, but the dark and the cold and the roads and the driving. Its cozy and nice some days. Maddening and isolating on others. So we too can use this time of fall to inwardly prepare. And we do without knowing it. Boxes of toys get packed away in the summer, and we start organizing. This box of puzzles will be good for winter, I find myself thinking. And oh, definitely clearing out the garage for some time on the scooters on those crazy cold days. That will be great.

And etc.

We all do this right?

And now to the point:

This past week we again talked about dragons, in our wonderful magical alphabet journey. D, OF COURSE, is for dragon. And we paint a lovely little dragon from a painting story I found. And we practice our Ds and talk about different kind of deer and we read about St. George and the Dragon (who has come to represent St. Michael in many myths and stories told this time of year) and somewhere in the back of my mind  I start to think about my own dragons, and banishing them from the kingdom of my own little world.

The sun rises high (paint a rich yellow sun. rinse brush)
 In an indigo sky. (paint a rich blue sky. rinse brush)
A sunbeam streaks by (dip brush in yellow and
drag through the blue sky into the yellow sun)
 So a dragon can fly!
 (refine your streak into a dragon shape...
the green will appear as you stroke the brush from the blue sky
into the yellow sun and back)

And the day disintegrates. Yelling, in frustration, when the water is boiling over on the macaroni and the baby ONLY wants held, and the kids are fighting for the UMPTEENTH time over who gets to play with the ball of yarn they found and I realize I havent eaten yet today. And I find myself snatching up the baby, turning down the stove, and YELLING, "PLEASE FOR THE LOVE OF GOD STOP FIGHTING."

And the dragons rear their heads, thick and strong. Impatience. Unkindness. The grumpy crabby dragons with three heads and fire and ugly scales.

D is for dragon, I think.

And I start to cry as I send the kids outside and call dada. I cant do this, I say. I am horrid. I am mean and tired and grumpy. But then I regroup. And I drink tea. And I read my favorite parenting blog (see side link).

And I think, yes indeed, D is for dragon.

And I realize I need to kick mine out of our little kingdom, like St. Michael, pulling out my golden sword, shining golden cape flowing behind me...

But how?

little man's page of D's

By being intentional, I suppose. I mean, right? This is how we conquer things.

Our family has little sayings, Gentle hands gentle touch, we tell our toddlers when the touch the new baby. Gentle hands, gentle touch, when brother tries to wrestle his golden haired sister. And now, our new one, for this season of bigger kids, Kind words, kind voices. We use kind words, we use kind voices.

And I tell myself that too. Be kind mama, to these little people, use kind voices, kind words. Discipline is really leadership, right? It is setting an example. If I can be kind in correcting, even when the pot boils over and the baby screams, they can learn to be kind when they too are upset, when sister knocks over a perfect tower or brother retaliates by hurling princesses across the room.

And my empathy grows with them as I watch these kinds of struggles, feeling so aware of my own dragons rearing their heads inside of me. I want to spew fire when dada gets home an hour late from work. When baby throws her dinner all over the clean floor. OH! My poor little babies. I know I know! It sucks! Those dragons are tough. And they are always gonna be with us. But, here is the key, we can tame them. Use them. Passion is part of parenting. Part of being human. Part of life on this earth. USE IT.

And I hug them close, and kiss their little faces, and say sorry.

Draw your golden cloak around you, pull out your sword, and fight on with me, I want to say to them. I am there, right in the thick of it with you. It is hard. But, together, we can win this battle. Dragons, beware.


Michaelmas Story of the Star Children
by Corinne Batzell
Once upon a time there were beautiful children who lived in the stars. One by one each of these children took a long, long journey over a rainbow bridge and down to earth. They brought with them from the stars, seeds and bulbs and roots to plant in the earth to make it a good and beautiful place. They dug into the earth and planted their seeds and bulbs and roots. They watered them when they were dry and watched that no one stepped on the places where the seeds and bulbs and roots were planted. They made sure that the weeds didn’t push their way over, crowding the plants and blocking out the sun’s light. As the little shoots of green poked their noses out of the earth, the sun warmed them and the Start Children watched over them with loving care.

But there was a terrible dragon who roamed about the earth and one day he came to the garden where the Star Children had planted their seeds and bulbs and roots. The dragon didn’t like to see such beautiful things coming to the earth. He felt very angry and he began to breathe red flickering fire all around the garden. The little green stalks and shoots that were growing up so carefully and beautifully began to dry up and wither and turn yellow and brown. The Star Children did not know what to do. They were so very sad that these gifts which they had brought to the earth were being destroyed by the dragon.

Suddenly a golden light filled the garden. It was a knight in shining armour riding on a beautiful white horse. In his hand was a golden sword. It was St.
Michael. The knight charged at the dragon and fought with him until the dragon was so worn and weary that he fell at the knight’s feet and promised to be his servant.

St. Michael turned to the Star Children and smiled on them and on the garden. The plants began to grown new green leaves and shoots and the children ran to get water for them.

St. Michael gave to each Star Child a golden cloak. “These golden cloaks will protect you always so that you may work on the earth to help all growing things.” He said.

And the Star Children put on their golden cloaks and watched over their garden. The plants grew and there were flowers, and the flowers were just the shape of stars
my drawing of the above story. the kids LOVE the drawings to illustrate the
story I tell. Then they copy the drawing and letters or, later, a verse or two.

litle man's version.
The verse we said was this...
Brave and true, Will I be,
Each kind deed, Sets me free,
Each kind word, Makes me strong,
Fight for the right, Conquer the wrong!
 
our dragon bread, made from a story/recipe out of the book "The Children's Year"
(Which you really should get!)
It was tasty but TERRIBLY hard and dense because I forgot the second rising...
oops.
Wednesday, October 10, 2012

anti-recipe #53 baby's first cake

So what I want to do is write about dragons, those inside of oneself in particular.

Instead, in order to balance out my last crabby-pants-woe-is-me post, I will write about this. Baby's first cake.

So our baby girl had her first birthday.

And we were in the middle of settling in...boxes all around...but I was like, you know what, every year for the other kids I end up buying a terrible tasting cake from the grocery store. But this baby?? I am going to make her the finest most wholesome cake possible!! I AM!

And so this is how I did it.

First I made crockpot applesauce a few days before, which is in this cake. Do you know about crockpots for making applesauce? Good heavens I wish I did earlier. If you remember, I have had horrible experiences trying to make applesauce. This however, is a breeze. Skin apples. Cut into cubes. Put cubes in crockpot. Add some sugar (or not). Add some cinnamon and nutmeg (or not). Turn on high. Stir occassionally. That is it. Simple. And DELICIOUS.

So I had some of that in the fridge. I used two cups. Then I added half a cup of brown sugar (or you could add honey) Then a combo of two cups white/wheat flour. One egg. Two tsps of baking soda. A tsp of baking powder. 2/3 cup of MELTED coconut oil (appx) A dash of vanilla. Cinnamon, nutmeg, pinch of salt.

Mix. Bake at 350 in a greased 9x13 inch pan for 45 minutes or so.

Cake.

Delicious cake.

I tried to create a cream cheese frosting without using a beater (which was still packed) Dont do this. Buy some. Or use a beater. Your call.

Here are some pictures of baby eating her cake. She is scrumptious, like her cake.

the kids helped decorate, can you tell?
timidly approaching the prey

is this how you eat it?

ew. i'm done. this is when she held up her hands and did the all done sign. :)


Tuesday, October 9, 2012

school efforts

So, do you want to hear about our first week of school?

Yes?

No, not really?

Well...

It actually kinda sucked.

Why? Wasnt it all roses and fairy stories and happiness and glitter?? (No, not glitter, glitter is evil, I dont have the stuff in my house, for real, I hate it.)

No. It wasnt all those things.

Why?

Because dear son got the evil flu from H-E-L-L.

As in puke, poop, horribleness all week. And, one thing about my dear sweet dramatic son, he is not the quiet sweet sick kid (like our little miss) he is a dramatic invalid. "MOM" he yells as he pukes or poops or lies on the couch writhing like a snake, "I AM DYING. DYYYYYYING!!! SNUGGLE ME MAMA! I AM DYYYYYYYYING"

Yes. This. THIS for an entire week.

On Tuesday I made him do stories anyway. Then Wednesday too. By Thursday he was getting weak and listless after not eating for so long, so I hung up my homeschool towel, if you will, and allowed TV consumption. Lots of it. Then Friday too. And Saturday. Sunday. Finally by Sunday after dosing him up with tons of homeopathic goodies he started to perk up. Then he got hives. All over his legs. Then his arms. Then again yesterday, so we gave him Benedryl, they went away. Then again this morning, literally as he is picking up a crayon to draw (C is for Crystal CAVE. Lets draw a crystal cave! Then bake Chocolate Chip Cookies!!) He says to me. My hand kinda hurts. Yes, because its swollen and covered in hives, despite the preventative Benedryl dose we gave that morning. And his feet too.

GOOD GRIEF! REALLY??

My mother says. You need to be more flexible. Homeschoolers are flexible.

HA HA. Well, maybe. But really, I need my kid to NOT BE SICK ANYMORE.

Oh LORDHAVEMERCYICANTTAKEITANYMORE.

Ok. SO. The next homeschooly post will be full of rainbows and fairy stories and roses (but never, EVER glitter) I promise. But so far, this is how we are doing with homeschool. Getting bitten in the ASS by real life. HA.


Wednesday, October 3, 2012

zen moment, fall is here

Mama?

Yes?

Let's go for a walk in the woods. All of us together.

Okay, I say.

And the trees whispered their hellos and we found the reddest leaf.

Dinner can wait.

crafty fall pumpkin dolls

Oh, to have my crafty mojo back. Oh. So great.

So I started feeling back into it with the cooler fall evenings back on the farm before we moved, and this is what I came up with - pumpkin dolls.

I was perusing Pinterest (as one does) and little miss came up to me. Ooooh, she says, go back go back! And there she was, a tiny little pumpkin lady.

I was like, oh, you like that?

And she was like, YES!

And I was like, Oh, I could totally make that for you.

And she was like, YES PLEASE!

And so I did.

We found an orange sweater of mine gathering dust in my mom's incredible crafting room. (It had been passed to a sister who passed on it.)

Then a bit of wool (no shortage of that at my mom's place).

Then some sturdy plain fabric for the head, a bit of yarn and thread, and VOILA. Pumkin lady.

I asked little man if he wanted a little pumpkin gnome too, to quietly snuggle in his pocket.

He said yes. (Smile)

So I took pictures of that effort, to show you how I did it. So here they are. Happy sewing!


it started with this little pumpkin lady.
 

cutting apart the sweater. arms went to a pair of AMAZING wooly pants for baby
and then a pixie hat to match, for her birthday. :)

the basic shape of the body and head. i hand sewed the whole thing, just easier


stitch the head up the back, then stuff

then, this is the tricky part, fold over the top of the stitched part to make
the head round. does this make sense?

now position your head on your stuffed body. do the eyes and mouth AFTER
because its really hard to get it on exactly straight.

stitch all the way around the neck. here is the back of the head, to be covered
with a quaint little gnome hat

here is the shape of the gnome hat. stitch up then turn inside out.
leave the bottom 1/2 inch or so unstitched so that it can pull around the whole
head of the gnome, you will see what i mean
 
see? position the hat, then sew into place, around the neck and the face.
 
i used the same thread to then put on a mouth. stuff a few bits of yarn or
wool in the top of the cap prior to sewing for some hair. sew this section
firmyly, especially for babies. they WILL try to pull it out :)
he LOVED his little doll
 
a larger doll for baby dear

which was happily received :)

 
she is getting good at hugs

oh baby dear. i love you
Related Posts Plugin for WordPress, Blogger...